


Jenkins is a powerful application that allows continuous integration and continuous delivery of projects, regardless of the platform you are working on. It is a free source that can handle any kind of build or continuous integration. You can integrate Jenkins with a number of testing and deployment technologies. In this tutorial, we would explain how you can use Jenkins to build and test your software projects continuously.
How to Create Users & Manage Permissions: Role Strategy Plugin

Generally, in a large organization, there are multiple, separate teams to manage and run jobs in Jenkins. But managing this crowd of users and assigning roles to them can prove troublesome.
By default, Jenkins comes with very basic user creation options. You can create multiple users but can only assign the same global roles and privileges to them. This not ideal, especially for a large organization.
The Role Strategy Plugin enables you to assign different roles and privileges to different users. You will first need to install the plugin in your Jenkins mange environment.
How to Create/Add a User
Step 1) log in to your Jenkins dashboard by visiting http://localhost:8000/
Step 2) You will now see options to create new users and manage current users.
Step 3)
- Under Manage Jenkins, Click Create User
- Enter User details like password, name, email, etc.
- Click Create User
Step 4) User is created
Install Role Strategy Plugin
There are two methods for installing plugins in Jenkins:
- Installing it through your Jenkins dashboard
- Downloading the plugin from the Jenkins website and installing it manually.
Step 1)
1. Go to Manage Jenkins
2. Click on the Manage Plugins option

Step 2)
- In the available section, screen Search for “role”.
- Select Role-based Authorization Strategy plugin
- Click on “Install without restart” (make sure you have an active internet connection)

Step 3)
Once the plugin is installed, a “success” status will be displayed.

Click on Go back to the top page.
Step 4) Go to Manage Jenkins -> Configure Global Security -> Under Authorization, select Role-Based Strategy. Click on Save.

Create Roles
In this step, we shall learn to certain roles to a single user or a group of users.
Step 1)
1. Go to Manage Jenkins
2. Select Manage and Assign Roles

Note: that the Manage and Assign Roles option will only be visible if you’ve installed the role strategy plugin.
Step 2) Click on Manage Roles to add new roles based on your organization.

Step 3) To create a new role called “developer”,
- Type “developer” under “role”.
- Click on “Add” to create a new role.
- Now, select the permissions you want to assign to the “Developer” role.
- Click Save

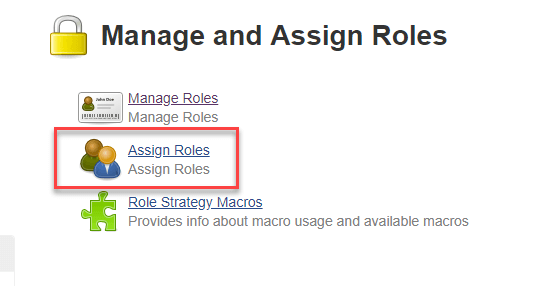
Assign a Role
Step 1) Now that you have created roles, let us assign them to specific users.
- Go to Manage Jenkins
- Select Manage and Assign Roles
Step 2) We shall add the new role “developer” to the user “what you enter in user”
- Selector developer role checkbox
- Click Save
You can assign any role to any user, as per your need.
Project Roles
You can create project-specific roles under Project Roles.
Step 1) In Jenkin’s Manage and Assign Roles
- Enter a role as “tester”
- Add a pattern to this by adding tester.*, so that any username starting with “tester” will be assigned the project role you specify.
- Click Add
- Select privileges
- Click Save
So now you can see how the Roles are doing in Jenkins. In the next part, we will discuss How to Create Builds with the Jenkins Freestyle Project.

0 Comments