


Jenkins is a powerful application that allows continuous integration and continuous delivery of projects, regardless of the platform you are working on. It is a free source that can handle any kind of build or continuous integration. You can integrate Jenkins with a number of testing and deployment technologies. In this tutorial, we would explain how you can use Jenkins to build and test your software projects continuously.
Install Git Plugin

Jenkins has outstanding plugin support. There are thousands of third-party application plugins available on their website. To know if Jenkins supports the third-party applications you have in mind, check their plugins directory at this link.
Installation of Plugins in Jenkins
Jenkins comes with a pretty basic setup, so you will need to install the required plugins to enable respective third-party application support.
GitHub is a web-based repository of code that plays a major role in DevOps. It provides a common platform for multiple developers working on the same code/project to upload and retrieve updated code, thereby facilitating continuous integration.
Jenkins needs to have a GitHub plugin installed to be able to pull code from the GitHub repository.
You need not install a GitHub plugin if you have already installed the Git plugin in response to the prompt during the Jenkins installation setup. But if not, here is how you install GitHub plugins in Jenkins and pull code from a GitHub repository.
Install GIT Plugin
Step 1: Click on the Manage Jenkins button on your Jenkins dashboard:

Step 2: Click on Manage Plugins:

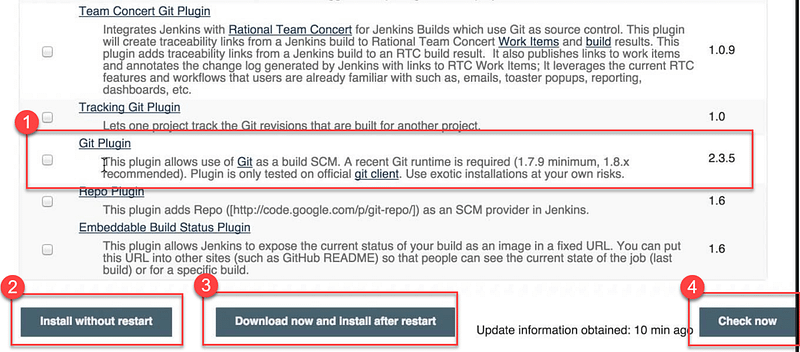
Step 3: In the Plugins Page
- Select the GIT Plugin
- Click on Install without restart. The plugin will take a few moments to finish downloading depending on your internet connection, and will be installed automatically.
- You can also select the option Download now and install after the restart button. In which plugin is installed after the restart
- You will be shown a “No updates available” message if you already have the Git plugin installed.
Step 4: Once the plugins have been installed, go to Manage Jenkins on your Jenkins dashboard. You will see your plugins listed among the rest.
Integrating Jenkins with GitHub
We shall now discuss the process of integrating GitHub into Jenkins in a Windows system.
Step 1) Create a new job in Jenkins, open the Jenkins dashboard with your Jenkins URL. For example, http://localhost:8000/ (this depend on the local port that you enter in the setup)
Click on create new jobs:

Step 2) Enter the item name, select job type, and click OK. We shall create a Freestyle project as an example.

tep 3) Once you click OK, the page will be redirected to its project form. Here you will need to enter the project information:

Step 4) You will see a Git option under Source Code Management if your Git plugin has been installed in Jenkins:

NOTE: If the Git option does not appear, try re-installing the plugins, followed by a restart and a re-login into your Jenkins dashboard. You will now be able to see the Git option as mentioned above.
Step 5) Enter the Git repository URL to pull the code from GitHub.
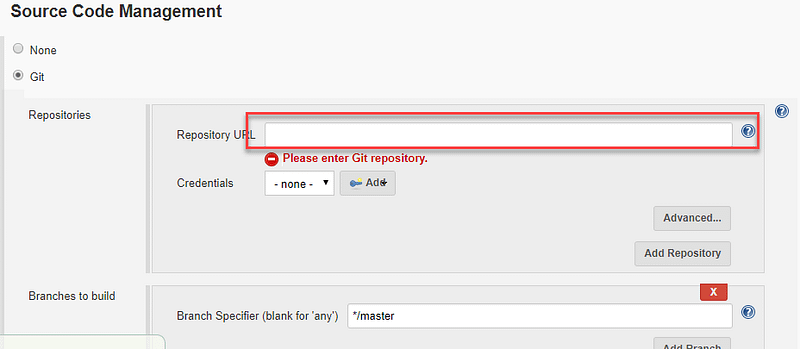
Step 6) You might get an error message the first time you enter the repository URL.
This happens if you do not have Git installed on your local machine. To install Git on your local machine, go to this link.
Download the appropriate Git file for your Operating System, in this case, Windows, and install it onto your local machine running Jenkins. Complete the on-screen instructions to install GIT.

Step 7) You can execute Git repositories in your Jenkins once Git has been installed on your machine. To check if it has been successfully installed onto your system, open your command prompt, type “Git” and press enter. You should see different options come up for Git:

This means that Git has been installed in your system.
Note: If you have GIT already installed in your system, just add the git.exe path in Global Tool Configuration.
Step 8) Once you have everything in place, try adding the Git URL into Jenkins. You will not see any error messages:

Git is now properly configured on your system.
So now we did up to the git install. In the next part, we will discuss how to Create Users & Manage Permissions.

0 Comments